Hobbyist Corner


DIY Painting Station for Miniatures
Painting miniatures can lead to a very unorganized desk. No worries, crafting your own painting station for miniatures is not as hard as it sounds. Here we show you how.
Are you looking for an easy and inexpensive way to have your own painting station for your miniatures? Well, look no further! The Free Bundle brings you an exclusive miniatures painting station that you can build all by yourself from those annoying Amazon boxes you have laying around the house.
Why have a miniature painting station? Well, if you paint miniatures, eventually you’ll want to store your paintings somewhere. Some people use a tupperware plastic container, others simply throw their paint bottles in a shoe box or leave them in the back of a drawer. That can be fine at the beginning, but eventually it’s better to have a quick way to find our colors with as little work as possible. After all, painting miniatures is difficult enough, right?
"That can be fine at the beginning, but eventually it's better to have a quick way to find our colors with as little work as possible."
This is an easy project to make, even for those who do not have technical skills. It uses Amazon boxes that would otherwise end up in the garbage, do not uses any wood, screws or nails (unless you want to, since the exterior can be done with either MDF or several layers of cardboard glued together, your choice) and saves space on your desk.
Want more? We have more: by building this painting station you will not only get rid of those ugly amazon boxes, but end up having a place to store your paint bottles, will impress your friends with your handcraft skills and go green, all at the same time.
Isn’t that cool?
"...[it holds] up to five of your bottles of paint, though you can easily fit up to 8 bottles from 10 to 18ml, depending on their size."
Best of all, its free: there is no need to order anything Online or use a laser cuter with this one, simply grab yourself a pair of scissors, an X-Acto knife (or any similar knife), some hot glue, some band-aids and dial 911, because we are going to build ourselves a painting station!
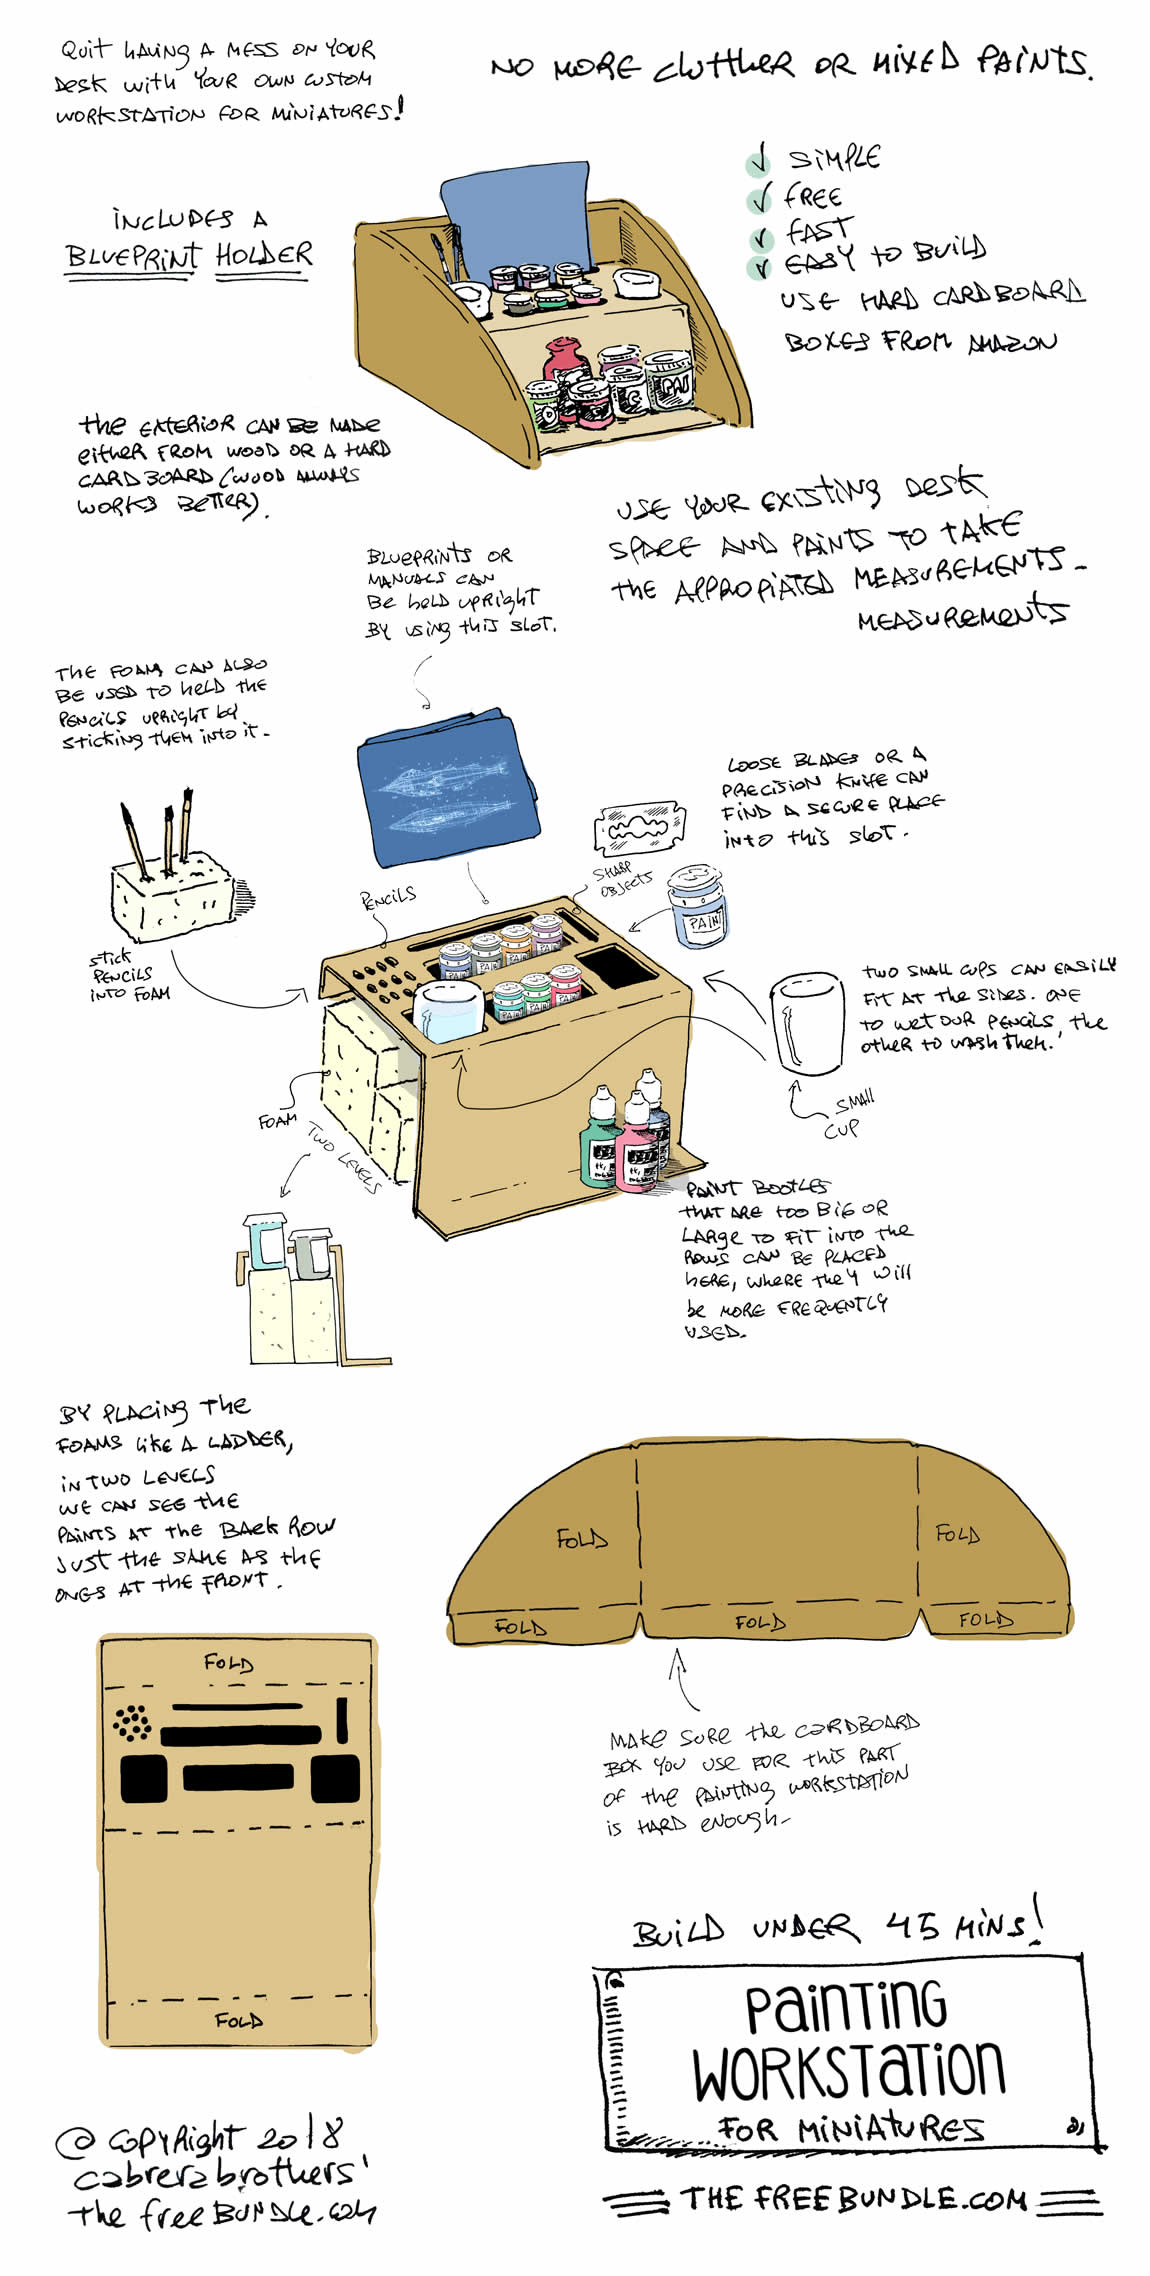
Our exclusive model for the beginner hobbyist features: two rows of quick access for up to five of your bottles of paint, though you can easily fit up to 8 bottles from 10 to 18 ml, depending on their size (and as many types and sizes of bottles as you want in the main storage area).
It also features holes for your brushes, one slot to store your files, knives, and sharp objects. Plenty space for your glue or hot glue gun also on the main storage area, two water holders next to the rows of paint bottles and a special slot for those annoying instructions that scale models sometimes come with.
Here’s the blueprint:
 DIY Painting Station
To get a better look at the blueprint, you can download the full version by following this link. To build the painting station we will need:
- Hot glue sticks
- Hot glue gun
- One amazon cardboard box (two for better results)
- A x-acto knife or equivalent.
- Scissors.
- A pen (who doesn’t has a pen!)
- A ruler (or we can make one from one of the edges of the cardboard box)
- A thick strip of foam (10x10cm or 4x4 inches, or we can stack thin layers until we get the thickness we need)
A note: measurements can vary depending on the bottles and the space available, since not every country uses the same measures for their bottles, we don’t include measurements in the blueprint. Your desk, your space, your measures. Its all up to you. This project is flexible enough that you can adapt it to whatever situation you find yourself with in terms of available space.
Let’s get to it
Gather your paint bottles and choose which ones will go on the quick access rows and which ones will go on the main storage area, where the big bottles will often get stored. Then, simply use your pencil to draw a line around the bottles on the cardboard box, carefully delineating the space needed and leaving room for the other slots shown in the blueprint.
The foam has two purposes: to lift the paint bottles from the back row so we can see which colors are and hold the pens, brushes, sharp objects and blueprints in place. The diagram on the image is pretty self explanatory! All you need to do now is hot glue your painting station and start using it!
If you don’t have a hard cardboard for the exterior shell, you can glue two or three layers together and voila, instant hard cardboard! Hopefully, this will be your first step into the wonderful hobby of painting your miniatures. This station is intended for beginners only, but we will be adding new painting stations over the next issues for moderate and advanced hobbyists!
